I can't believe it's only 6 days until Christmas and 5 days until my daughter's 12th birthday! (on Christmas Eve). I have finished all the cards and we delivered the last few to the neighbours this morning. I love Christmas, it's such a cosy family time.
Here's a picture of the cards I made using the 'Stitched with cheer' stamp set from the Stampin' Up! Autumn/winter catalogue.
I also made this card using the 'Stampamajig' This is a brilliant tool that enables you to position stamped images exactly where you want them (as seen here for lining up the Christmas trees).
I have had a Stampin'Up! delivery!! I always get excited when new supplies arrive.
I ordered the Candy Cane Lane paper in this order, I already have the cookie cutter stamp set and punch bundle from the christmas catalogue and it's fab! I have made a lot of projects with this set (pictures to follow) to sell in the tea shop where I have other things on sale. The ladies there were keen to get Christmas stock in too, so I have concentrated on that this week (in between my 'day job' at the preschool!). I am going to use this paper to decorate some Crumb Cake boxes that I've made and I want to have a go at the paper wreathes that I've seen on facebook and pinterest recently.
I have also treated myself to the Stampin'Up! Envelope punch board! I'm excited to have a go with this, it means I can make cards that are not standard sizes and still make an envelope to match! Also, I have seen lots of exciting things that you can make with this punch board including little Christmas crackers and other types of boxes.
Well today has been very exciting! I have taken some of my handmade projects to sell in a local crafty tea shop. The ladies in there are lovely and so positive about everything I took to show them.
Packs of hand stamped gift tags.
Wall hangings.
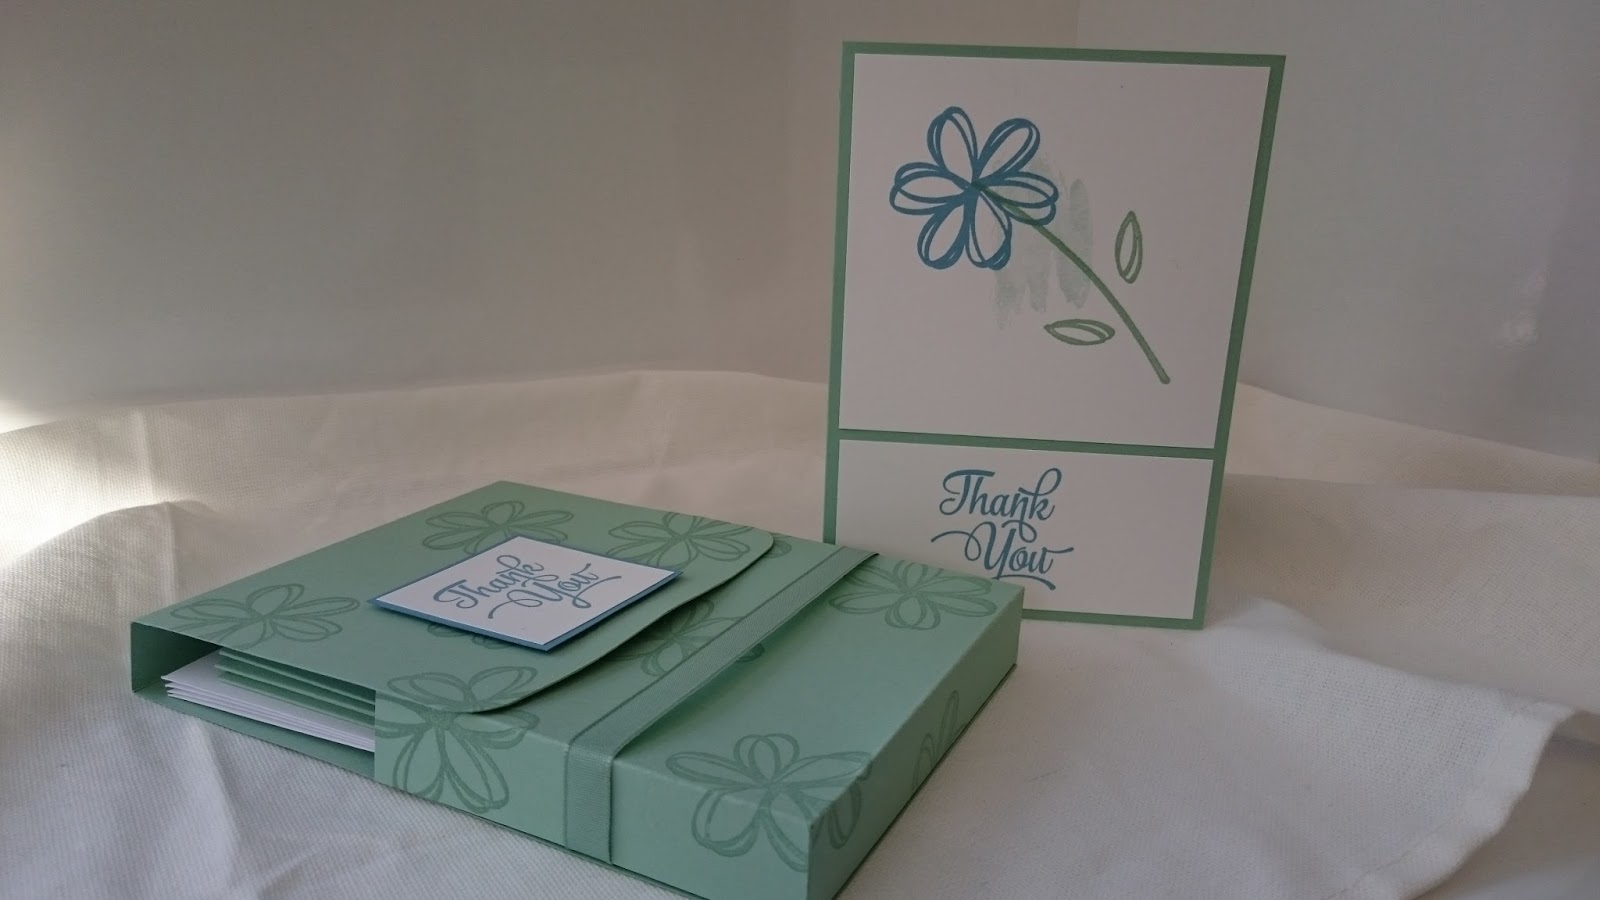
A box of handstamped thankyou cards.
I now have to start on Christmas things to make and sell!
The most exciting part of my first ever onstage was being selected to be one of the display stampers!! I had lots of fun playing with top secret, brand new products! I was sent the products at the beginning of September and here are a few of the projects that I created for the display boards.
When I arrived at Telford I was thrilled to see my name up on a notice board with the other display stampers as well! I still can't quite believe it x
Well the day has finally arrived! My first ever Stampin'Up! onstage!! I have been sooo excited about this! Here are a few photos from the day.
All the swaps that I received from all the other lovely demonstrators that had travelled from all over the U.K to be in Telford.
Me with my uplines and stamping friends!
The team gifts I made for my friends, earrings made using the 'Cookie Cutter Christmas' stamp set and punch.I stamped the reindeer onto shrink plastic,once heated and shrunk these are just the right size for jewellery charms! I made my own background paper using 'Stitched with Cheer' stamps.
Well it's been a busy few weeks so apologies for the lack of posts on my blog.
As Stampin' Up! onstage is only a few weeks away (5th November 2016) and I will be there(!!) I have been working on my 'swaps' for the day. As this will be my first 'onstage' I am only making 40. I have decided on a small 3d project using stamp sets from the Stampin'Up! Autumn/Winter catalogue. This slim box is designed to hold a teabag, here I have used ginger (a bit Christmassy!) The stamp sets are 'Cookie Cutter Christmas' and 'Stitched with Cheer'.
It's good to get back to normal after the long summer holidays! My daughter is enjoying high school and I am back at work (in the pre-school) with lots of new happy faces and characters to get to know.
To start the Autumn off I have created a card with the 'Sunshine sayings' stamp set and the 'Sunshine wishes' thinlits.
This is a simple card using only 'crumb cake' and 'very vanilla' cardstock with a little 'crumb cake' ink.
I love the clean look of this card, its quite different from the cards I normally create. The card base is half a sheet of A4 'crumb cake' scored in half. I then used a mat layer a few millimetres smaller, still in 'crumb cake' to add some depth to the card. I die cut the heart die and the 'love' word die in 'very vanilla' . I adhered the love die cut and the centre part of the heart die cut to the card using 'tombow' multipurpose glue. The more delicate part of the heart die was adhered with 'stampin dimensionals' to raise it from the card and add dimension. I stamped the 'you' onto 'very vanilla' cardstock in 'crumb cake' ink and cut it out by hand. I stuck this to the card with dimensionals also. I hope you like it.
Woohoo!! I have something new to play with! These stamps are fab! there are so many different ways to use the sentiments and the die cuts are a bit 'scribbly' in style which I really like.
Here's a picture of the set and the die cuts so you can have a sneak peak at what I will be playing with. If you have any questions or would like to order from me please get in touch x
Well this week has been quite busy what with school holidays etc! I've managed to spend time in my craft room though,making myself some business cards. One of my up lines had this idea. Basically you use all the tiny scraps of cardstock and DSP which everyone has laying around and using the Stampin Up! angel policy stamps (which are in the current catalogue, although I am using last years!)
To make your cards and either print, or do as I have done and print off lots of sticky labels with all your details on and stick them to the back of your little cards. It's win, win! you get lovely personalised business cards to hand out to everyone you see, and you use up a lot of your scraps too! please leave a comment if you have ideas for using up scraps.
I was going to apologise for using the Swirly bird stamp and die set, again but then I thought NO! I am giving you lots of ideas on one stamp set and showing how versatile this set is. So if you buy the set you will SAVE yourself money, right??! (well that's how my brain works anyway!).
Here is a variation on a card I made previously but with different sentiments and a slightly different layout, hope you like!
As I live so close to the 'Norfolk Broads' I was inspired to create some sailing boat cards! I have used the 'swirly bird' stamp set again (what else!).For these cute cards I stamped the sailing boats out onto whisper white cardstock using various ink colours (basically whatever took my fancy!) and then I cut them out. I used watercolour card for the background and watered down some Marina mist ink. I 'washed' the watered down ink in a splat kind of arrangement (!!) and left these to dry.
Slightly off topic, whilst working with the marina mist ink pad I accidentally leant my elbow into it and four days and four showers later I still have a rather attractive marina mist coloured elbow! (Note to self : more moisturiser on my elbows!) Sorry about random sharing but this did make me laugh to myself.
Anyway, back to the cards. Once the backgrounds were dry I used the splatter stamp from the swirly bird and stamped in Mint macaron and stamped on the edge of the marina mist inking, to look like water splashes, I think this helped to created some movement to the boats. The sentiments I used were from 'one big Meaning' and 'Sunshine sayings' These were stamped onto whisper white in a coordinating ink colour and cut into a pennant on each end (to look like a flag?) I have stuck the boats to the cards using stampin dimensionals to add depth. I am really pleased with how these turned out. I hope you like them.
Hello! just a reminder that the limited edition stamp and die bundle 'Thoughtful Branches' is available for you to order from Stampin' Up! (through me if you would like) from tomorrow 2nd August 2016. Its a fab kit with lots of possibilities, I even have a few Christmas ideas for this one! Here are two cards that were 'cased' from the 'Stampin' Up!' website.
Both of these cards are very different but both have clear embossing in the background.
Please get in touch if you would like to order or have any questions x
I am loving the colour Bermuda Bay! I have the cardstock, inkpad and bakers twine and I'm using it on everything! here is a thankyou card and upcycled jam jar that I am going to fill with mint imperials. I have wound the bakers twine around the jar and secured with sticky dots. The flower is one of the 'petite petals' stamps, stamped in bermuda bay and punched out. I hope you like it.
The last few weeks have disappeared!! My daughter has left primary school (!!!) ready to start high school in September. To thank her teachers and assistants we made five different thankyou cards and five boxes that we filled with homemade peppermint creams. The stamp set that we used was 'one big meaning'
The cards for the teachers and assistants.
Something a bit different today. I've made a wall hanging.
I used some chipboard and covered it in some designer series paper. I then added a layer of watercolour card that I had covered in pink pirouette ink that had been watered down with an aqua painter (stampin'Up waterbrush). Once that had dried I used watercolour wings stamp set and stamped my butterfly using pink pirouette ink,pool party and blushing bride. I cut the butterfly out using the butterfly framelits and my big shot and glued it onto the wall hanging. I used a sentiment from watercolour wings as well and die cut this on my big shot too. I stamped a petite petals flower in pool party and used the matching punch to punch out the flower. The paper roses were made using the pansy punch and some dsp. For each rose you need to punch out four flowers with the punch. Please leave a comment if you would like more details of how to make these roses. They are fun to make but a bit fiddly! I hope you like it.
No I haven't forgotten about the 'Swirly bird' stamp set! Here are two more cards that I've made using this fabulous set (here I have used the coordinating die set too).
These cards are both very different, it's really fun to think you make such a variety of projects with this one set.
If you would like to know how I made these or would like to order or have any other questions please leave a comment below, Thankyou!
I thought I would just post a picture of 17 boxes I have made using the curvy keepsake box thinlit. They look gorgoeous and are so easy to make using this one die (available at Stampin' Up! through me).
All you need to do is run the die through your 'big shot' twice with thick designer series paper or cardstock, glue the two pieces together and fold up each of the four sides of the box.
These are coming to work with me tomorrow. I work in a village preschool and we have 17 children leaving to go to 'big' school at the end of term. They will each get a helium balloon and these boxes will be perfect filled with sweets and used to weight them down (until they eat the sweets!)
These boxes are 6.4 x 7 x 6.4cm and would also be ideal as wedding favour boxes or to hold a small gift.
Oh my goodness! i can't believe how much rain we have had in the last few days!! with this in mind I thought I would share a simple watercolour technique with you. I have used the 'flower shop' stamp set and coordinating punch (the 'Pansy punch').
I started with a pool party card base and cut a piece of watercolour paper to mat onto the front of it (just very slightly smaller). Using my 'so saffron' ink pad and an aqua painter filled with water I 'washed' the diluted ink over the watercolour paper and put it to one side to dry. I did the same thing with pool party ink on a scrap of watercolour paper and let this dry too.
Once they were dry I stamped two flowers from the 'flower shop' stamp set onto the pool party watercolour paper, in 'sweet sugarplum' ink (I hope this makes sense!!) and punched them out with the pansy punch. On the 'so saffron watercolour paper I stamped the speckles from 'gorgeous grunge' to the left hand side using pool party and sweet sugarplum again. On the bottom right hand side of the card I stamped the sentiment (from 'watercolour wings') and glued this to the pool party card base. I wound some gold thread around my hand about eight times,lay this over the stamping in a spiral shape and stuck the two flowers over the top of it with stampin' dimensionals, this holds the thread in place.
There are so many different things you could do with this idea, just changing the colour scheme would give the card a completely different look, I hope you like it.
Hello, I thought whilst the sun was shining I would have a go at some summery cards. I have used 'Watercolour wings' for these cards.
For these cards I have chosen pink. I love pink, it can be soft and fresh or bold and vibrant. Here,the inks I have chosen are pink pirouette, soft sugarplum and marina mist for contrast.

The Watercolour wings stamp set is a 'three step' stamp set which means the final stamped image is created using three separate stamps. The base layer of the butterfly was stamped in pink pirouette ink randomly all over a piece whisper white cardstock. Then I used the next layer stamp in sweet sugarplum and created the outer edge of each butterfly. the final stamp gave each butterfly more depth and dimension when stamped into the centre of each one using marina mist ink. I love the result, it was really quick to do and to finish the cards I just wrapped some pink pirouette seam binding around the card and tied it into a knot then matted the stamped whisper white onto a Sweet sugarplum card base. As you can see the other card was made in the same way but using the inks in a different order and a pink pirouette card base. I hope you like them x
More ideas using the Stampin' Up! 'Swirly Bird' stamp set! I really hope I am not boring you with this as I still have lots of ideas!
We are having a meeting on Wednesday of all the local Stampin' Up! demos. We will be doing a shoebox swap (this will be my first one) The inspiration is to use a stamp set that you already, not Christmas related and create a Christmas card with it. Obviously I have used my favourite set of the moment 'Swirly Bird' and this is what I came up with.
But first, here is the 'Swirly Bird' stamp set in all its photopolymer glory!
My first Christmas card uses a 'Crumb Cake' card base, versamark ink pad and white embossing powder, and that's it!
I used various stamps from the set to create a snowman, even his twiggy arms are the stamp that creates the veins for the leaves. I ran the versamark ink pad along the bottom of the card to create the snowy ground, covered in white embossing powder and heatset it.
The next card is a 4"x4" again, I drew a faint pencil circle in the centre of a piece of 'Crumb cake' cardstock and stamped both the large and small leaves around the circle. I stamped the little bird in 'crumb cake' ink and added some 'Real red' on his tummy to create a Robin. The red 'berries' were a small swirl stamp which I then cut out. I stuck the robin and leaves onto my wreath with stampin' dimensionals to make them stand out. I also stamped the robin legs on the card (mustn't forget those). I made a bow out of 'Wild Wasabi' ribbon and mounted this onto a 'Wild Wasabi' card base.
My final card is nice and simple and is the one I will be using for the shoebox swap on Wednesday. Again I have used a 4"x4" 'wild wasabi' card base with a crumb cake layer to do the stamping on.
This time I have included the 'Swirly bird' die set and cut the largest die out of whisper white to create my snowy ground, I glued this to the crumb cake layer. The Christmas trees were made using one side of the sailing boat stamp in wild wasabi ink. The tree trunks were made with the tiny bow stamp ( which I only inked half of). Using my white ink I used the dotty background stamp to make it look as though snow was falling. I really hope you like them.